How To Photobucket

HoopyFrood

It's me! Hurrah!
Joined
Jul 13, 2006
Messages
5,525
Location
The Cloud
Here goes the walkthrough of using Photobucket to post photos here. I've tried to be as thorough as possible, as I don't know how much people know.


Upload the photo to the account.

Just need to click on the green upload button at the top.

walkthrough1.jpg


This will take you to this next screen:
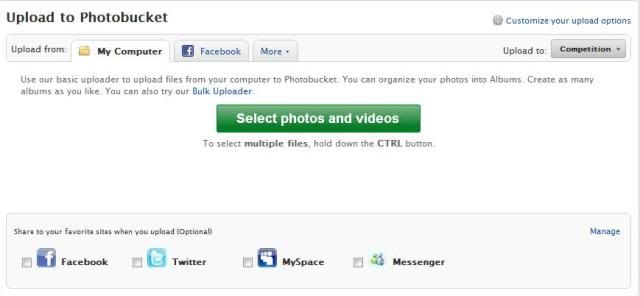
walkthrough2.jpg


where clicking "select photos and videos" will open the usual window on your computer to allow you to choose which photo(s) you want to upload.

While uploading you'll probably get bombarded by some unavoidable, automatic advert. I hate those.

Once uploaded, you'll go back to the album with with uploaded photos all there waiting for you. If you hover over the one you want, it'll pop out like this:
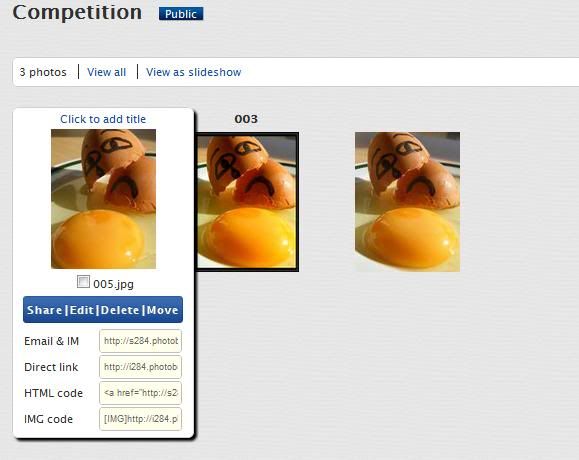
walkthrough3.jpg


The link that you want is the one titled Direct Link. Left click on the link in the box and it will automatically copy the link for you (instead of right clicking and choosing 'copy' or pressing ctrl and c) and it will tell you that the link has been copied like so:
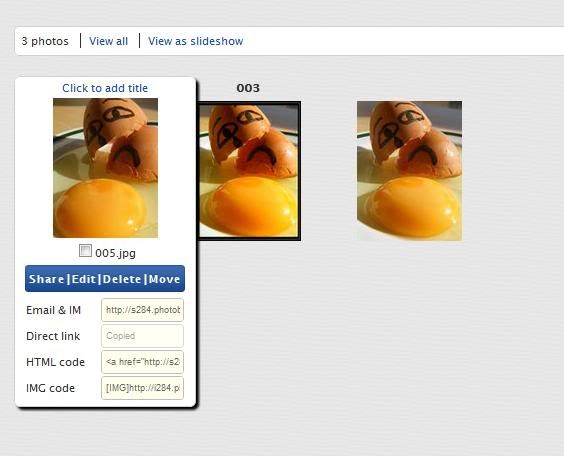
walkthrough4-1.jpg


On a side note, if you're looking at individual photos this same box will be on one side, so you can get the link from there as well.

Now come back over to the Chrons and on the post you wish to add your photo to, click the 'mountain' yellow box as circled and a little window will appear. Simply paste the copied link into the box (this will require right click and paste, or ctrl and v).
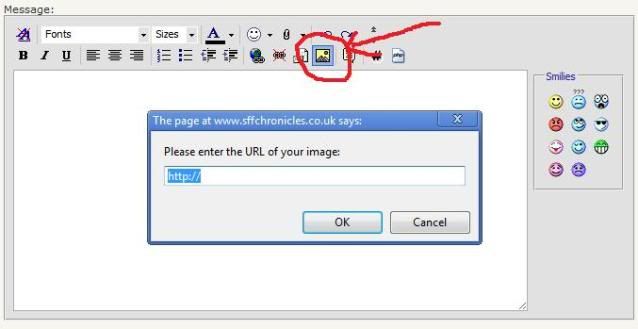
walkthrough5.jpg
 
Click OK, and hey presto! Photo appears in post in full and looking beautiful:

005.jpg


I hope this is understandable, let me know if anything's not making sense.
 
Now, as a bit of an extra, I though I'd point out the editing options on Photobucket because it can really help a photo. Editing just helps all the elements that are already there and makes them stand out a little more.

I haven't used Photobucket for a few months and I've noticed they seem to have twelve thousand new editing options. I haven't played around with many and tend to stick with the same ones and the only 'knowledge' that helps me with them is if they feel right on the photo. It's definitely worth just spending time playing around with them all to see just what you can do to a photo.

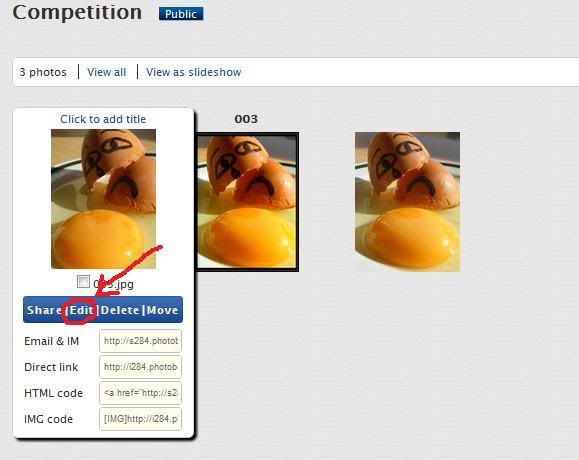
Anyway, you'll first want to click here, on edit:

walkthrough6.jpg


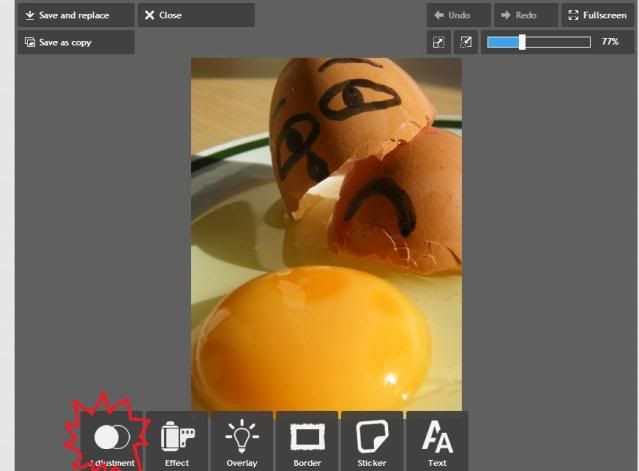
And it will bring up a fancy screen full of editing options. For most of the stuff, you will just need Adjustments:

walkthrough7.jpg


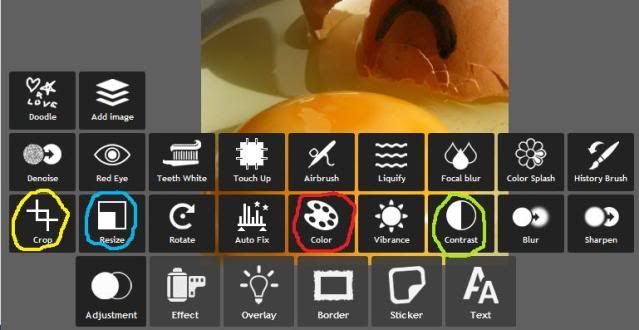
But here you'll have some of the options you're most likely to need:

walkthrough8.jpg


If there are things in your photo you don't want, or you want to centre in on a target, you can CROP it.

If you think the photo is too large for a post, you can RESIZE it.

To make colours stand out a bit more, choose COLOUR (all right, color) and up the saturation.

If you want to sharpen the CONTRAST between the colours and shadows in your photos, to give a more crispy feel, you can change the contrast. There are also options to change the brightness of the photo, depending on whether you feel it's too dark or light.

And to finish it off, I usually whack on a border:

005-1.jpg


Compare it to the unedited version above and you'll see that while the changes are relatively small, it does just give the photo something a little extra.
 
It's brilliant! Does it automatically change the size of the picture to fit the site (chrons) or does that need to be done by the user?

Oops! Too busy posting away. I'm not entirely sure, my photos always seem to turn out at acceptable sizes. But I've detailed how to resize posts above, so if it needs to be done, you know where!
 
It's brilliant! Does it automatically change the size of the picture to fit the site (chrons) or does that need to be done by the user?

No, you have to do it yourself and I pretty much think it's trial and error (so lots of previewing posts). It also depends partly on the size of the pic you took. My camera is usually set at 1.3 mega pixels. This means I have to resize to about 70% to get the pic to be just less than the size of my screen -- no scrolling required to see it all.

There may, of course, be a more precise way.

Just one wee note on putting the photobucket link into the Chrons dialog box. The box already has http in it. So does your copied link. Delete the http already in the box or you'll have http://http://..... and it won't work. Well, that's what I do anyway.

Oh, and good stuff Hoopy.
 
Yeah, was going to mention that! Although, because it's already highlighted, if you right click and paste straight into it, I'm pretty sure it deletes it in the process.
 
Most excellent guide! Except, I don't do the 'direct link' and the pasting into the box thingy here (and in fact, I've only just noticed the little yellow mountain pic now it's been pointed out!), I copy the IMG code and just paste that straight into a post. That's pretty much all I do.
 
Last edited:
For posting on here I generally go with a maximum dimension (either width or height) of 700 pixels which works will in most browsers.
 

Similar threads


Back
Top